
Saturday, December 10, 2016
Toadstool Ornaments have arrived!
I received my package of "Holiday Toadstool" Christmas ornaments today. And I am once again blown away by the creativity!
Many thanks to the talented women who created these small works of art! Already looking forward to next year's exchange!

Sunday, December 4, 2016
Toadstool Ornaments - Paper Mache How-To
Well, the 2016 Ornament Swap hosted by Val at Yarnigras is wrapped up and boxes full of handmade ornaments are en route all over the country.
I cannot wait to receive my package and see what my fellow swappers / crafters have dreamed up for this year's theme of "Holiday Toadstools".
As for myself, I had a couple ideas started and scrapped.... and finally decided on paper mache (I cannot type the words paper mache without hearing Woody Harrelson saying "PAY-pee-err MAshay" on Will & Grace - - anyone else remember that episode?)

I was so pleased with how they turned out -- just a little rustic with some bling -- like me!
And here is how I created them:
You will need:
First you need to make your paper mache form..
 Once your forms are ready, it's time to mix your paper mache medium.
**crafter's note: I wear latex gloves for this process - - you should have a box of latex gloves in your kitchen and craft room!! They are so cheap and are really a crafter's best friend!!


 Thanks so much for checking out my project today!
XOXO
Shelly

I cannot wait to receive my package and see what my fellow swappers / crafters have dreamed up for this year's theme of "Holiday Toadstools".
As for myself, I had a couple ideas started and scrapped.... and finally decided on paper mache (I cannot type the words paper mache without hearing Woody Harrelson saying "PAY-pee-err MAshay" on Will & Grace - - anyone else remember that episode?)

I was so pleased with how they turned out -- just a little rustic with some bling -- like me!
And here is how I created them:
You will need:
- Tin Foil
- Toothpicks
- Flour
- Water
- Old book pages or newspaper, torn into strips
- a decopauge or gel medium for sealing (I used Omni Gel that I picked up at Michael's -- highly recommend!)
- Paint Brushes
- Round Stencil Dauber
- Eye Screw (for hanging)
- Baker's Twine
- Hemp Twine
First you need to make your paper mache form..
- tear off a piece of tin foil about 12 - 14", place a toothpick in one corner (this will give your stem support) and start rolling inward. After a few rolls, fold and crunch and slightly tear foil to create your stem and then crunch foil into toadstool cap shapes - your form should be one continuous piece - - there is no perfect toadstool! Every toadstool form I made is completely different! Thick caps, flat caps, misshapen caps - they will ALL look good!

- Mix 1 Cup Flour and 1 Cup Water with an immersion blender to create a thin watery paste. This amount was enough to create 12 toadstools which each measured 4 - 5" tall with caps measuring from 2" to the size of my palm.
- Dip your torn pages into paper mache batter and start covering your tin foil form. I used about 3 layers to cover. (and again, wash your bowl immediately when finished!!)
**crafter's note: I wear latex gloves for this process - - you should have a box of latex gloves in your kitchen and craft room!! They are so cheap and are really a crafter's best friend!!

- Let your pieces dry thoroughly. WOW - - 24 hours later, my pieces were still SOPPING WET! I didn't have time for this non-sense! I put the dryer rack in my front loading dryer and placed my pieces on top - - 2 cycles of 40 minutes on high - - cement hard shapes!

- Now we start painting! For my base, I used Delta Chalky White Acrylic Paint - - this is my "go to" white paint for crafting projects.
- Now paint the caps a bright, crimson red. After the red paint is dry, use a round stencil dauber to add white dots to your toadstool cap.
- Let dry

- Brush entire toadstool with Omni Gel Medium (or other gloss/matte medium of your choice) and let dry
- Once dry, brush another coat of Omni Gel Medium on toadstool cap.
- Immediately pour an iridescent glitter all over cap of toadstool (I used Heidi Swapp Marquee Love Chunky Glitter -- best glitter I have EVER used! LOVE IT!!!)

- The Omni Gel medium really tones down the color of the paint and makes a great adhesive for the glitter.
- Once glitter has dried, twist an eye screw into top of toadstool and use a combo of bakers twine and hemp twine as a hanger.


XOXO
Shelly

Saturday, October 22, 2016
Talavera Inspired Gourd Birdhouse
I have created this pottery inspired gourd birdhouse with the help of ScraPerfect
Full "how to" on the ScraPerfect blog today

Full "how to" on the ScraPerfect blog today

XOXO
Friday, October 21, 2016
A Grateful Grater (Thanksgiving Decor)
I have a fun project up at The Chattering Robins blog this weekend - an altered vintage grater!
Head on over to see all the details...
Grateful Altered Grater on Chattering Robins
 Have a crafty weekend!
Head on over to see all the details...
Grateful Altered Grater on Chattering Robins

Sunday, October 16, 2016
It's that time of the year....Annual Ornament Swap

Once again, I am participating in the Annual Ornament Swap hosted by Val of Yarnigras Swapper Spot! This swap is open to all crafters - so head on over to her blog if you are interested.
This year theme is "Holiday Toadstools" - - I already have some ideas swirling around my head!
Details are here: Holiday Toadstools Ornament Swap
Besides the Annual Ornament Swap, Val hosts a Halloween Zombie Swap and other themed swaps throughout the year.
Have a creative day!
XOXO

Saturday, October 8, 2016
Magically Perfect Scrap Products.....
I am so excited to share that I am now designing projects for ScraPerfect! I hope you will check out the ScraPerfect Blog and see all the fab projects the team shares and learn about their line-up of products - - you will wonder how you ever crafted without them! You may already own some - I did! Embellie Gellie is a MUST HAVE for placing small items on your projects!
My first project and blog post are up today - - head on over to get the full story!

Have a crafty day!
XOXO
My first project and blog post are up today - - head on over to get the full story!

Have a crafty day!
XOXO
Friday, October 7, 2016
Pincushion Frame
Over at Chattering Robin's tomorrow - - get the full instructions on how to make this adorable pin cushion frame using CanvasStock!
Thanks to Einat Kessler for the inspiration and the permission to "lift" her project!

Thanks to Einat Kessler for the inspiration and the permission to "lift" her project!

Have a crafty weekend!!
XOXO
Friday, September 23, 2016
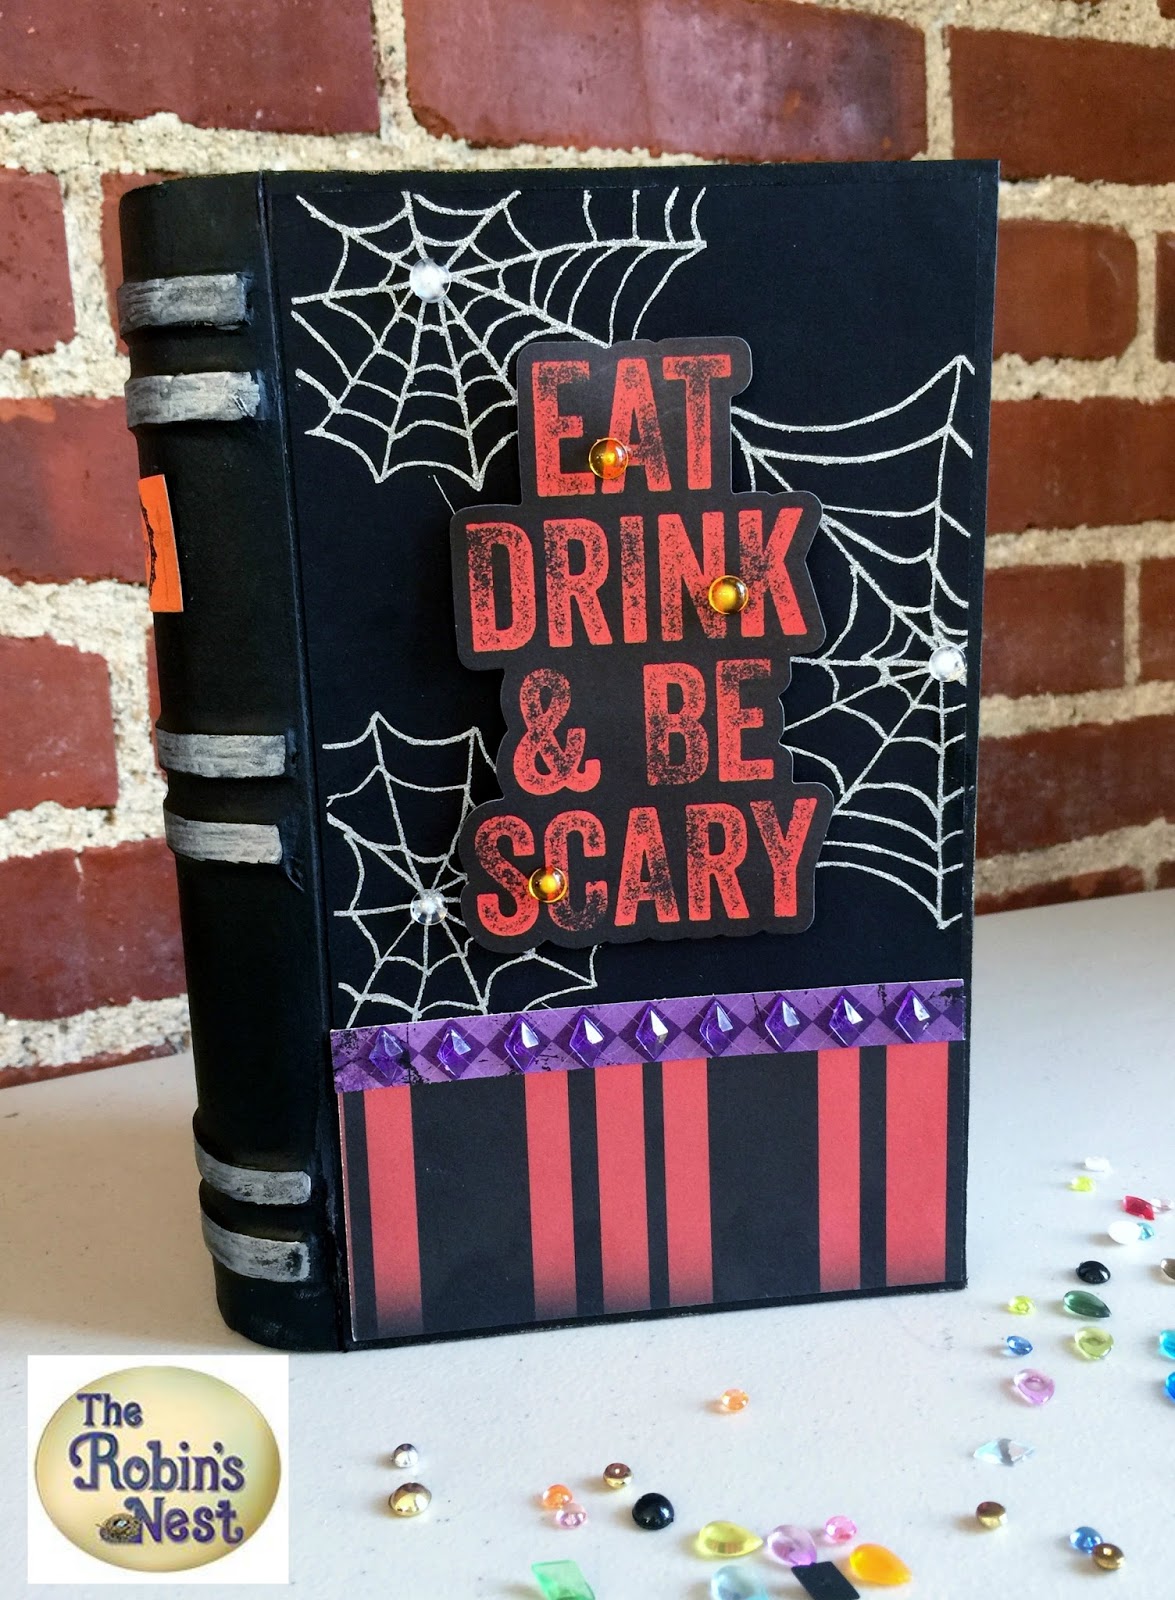
Eat, Drink & Be Scary! More Halloween Decor.....
This weekend I am up on The Chattering Robin's Blog with a paper mache box from Michael's made into a cute stash for Halloween treats...
Stop by the blog for the complete step by step!


XOXO
Stop by the blog for the complete step by step!

Have a crafty weekend!XOXO
Tuesday, September 13, 2016
Packing for a Crop / Retreat - Part 1 of 3
At the end of this month, I will be flying from California to Wisconsin to meet with some of the best friends a girl could have and attend a remarkable craft retreat at The Manor in Walworth Wisconsin.
I have said it before... it was only going to be a one time thing at this location.... but we fell in love with The Manor and with Karen & Ed. And this is the place we choose to fly in from all over the country to meet and scrap and craft every year.
Do you see that round room with all the french doors /windows? That's where I will be sitting and scrapping.
My biggest drain every year is TRYING TO PACK FOR THIS CROP! I usually leave during the week, after working heinous overtime hours to make sure my desk & job tasks are all caught up - - so there is no time for last minute craft packing!
I have decided to create the ULTIMATE SCRAP / CROP RETREAT CHECKLIST for packing.
And it will be available here on my blog, in printable PDF form later this week!
So check back!
XOXO
Monday, September 12, 2016
"Scrap Free Scrapbooking" - a great tool for your scrapbooking arsenal!
I purchased the eBook "Scrap Free Scrapbooking" by Jennifer Priest and believe it is one of the most awesome tools in my scrapbooking arsenal!
The book contains sets of cutting patterns and sketches along with examples of finished layouts. Simply choose a cutting pattern based on the number of layouts you want to create and get started. And get this, the cutting patterns use EVERY BIT of your paper - - NO SCRAPS!!
When I first looked at the book, I thought my creativity might be stifled - - I was so WRONG! I was able to switch pieces between sketches, embellish and journal and really let my crafty voice be heard. I was also able to cut out and glue down 5 layouts in 1 day - - I have witnesses! Of course, doing the embellishments took me a bit longer....
The examples I am sharing were made with 10 sheets of paper from the "Good Dog" collection by Imaginisce


I am currently getting ready for big retreat and you can bet, "Scrap Free Scrapbooking" will be going with me!
Thanks for stopping by!
Sunday, September 11, 2016
Journaling on the fly with your smart phone and Selphy printer!
I know we are SUPPOSED to hand write on our scrapbook layouts .... but frankly, when I journal on a page, I journal A LOT and need to get a lot of words to fit in a small space. That's why I really prefer computer generated journaling on a layout.


 Use your phone keyboard to type your journaling


In the past, when I have attended scrap retreats and crops, my journaling was left off to finish when I returned home. And then the layouts sat in a pile for quite a while (I believe I still have a stack next to me right now).
But I have discovered a great technique for journaling on the fly using my smart phone and Selphy printer!

To create a journaling card, you will need the following:
Smart Phone
Canon Selphy Printer
Internet Connection
Rhonna Designs Photo App for your Smart Phone
And here is the "HOW TO":
Open your Rhonna Designs App and choose the "idea" icon to the far left

Choose the background for your journaling (and there are SO MANY fabulous ones to choose from!)

You will have options for size and orientation along the bottom

Choose the "T" in upper left corner to choose your text / font


Now add some graphics

Now choose the share button

And there's your print button - - your Selphy should automatically pop up & you are now printing your journaling!

Trim to your liking and slap it on your layout! I feel so liberated being able to computer journal on the fly!
Thanks for stopping by today!!
XOXO
Saturday, September 10, 2016
Scrapbooking your vacation.. how long should it take?
I will be the first to admit (and all of my scrappy friends will agree) that I am the world's slowest scrapbooker.
When I go to weekend retreats, people around me are finishing 10, 20, 30 layouts. If I finish 5 in a weekend -- well I am thrilled and I'm okay with it. I really love the process of creating a page.
In August of 2013, I went on an INCREDIBLE 10 day trip to London and Scotland with my mom and uncle. It was an amazing experience.
And here we are in 2016. I am 18 layouts in and still working on the album (of course, I hopscotch around with my scrapbooking, whatever photo captures my fancy on any particular day is the one I will work on!)
The word "chronological" is NOT in my scrappy vocabulary! So my answer to "how long should it take?" is "as long as it takes".
You might wonder how I can remember all the little details from my trip - - one trick I used - everyday I mailed a postcard home with details on what we did that day. Not only do I have ready made journaling, but the postcards with their postmarks and stamps are becoming part of my scrapbook.
 So remember, don't ever compare yourself to any other crafter or scrapbooker - - there is no "right way"!
Thanks for stopping by today!

When I go to weekend retreats, people around me are finishing 10, 20, 30 layouts. If I finish 5 in a weekend -- well I am thrilled and I'm okay with it. I really love the process of creating a page.
In August of 2013, I went on an INCREDIBLE 10 day trip to London and Scotland with my mom and uncle. It was an amazing experience.
And here we are in 2016. I am 18 layouts in and still working on the album (of course, I hopscotch around with my scrapbooking, whatever photo captures my fancy on any particular day is the one I will work on!)
The word "chronological" is NOT in my scrappy vocabulary! So my answer to "how long should it take?" is "as long as it takes".
You might wonder how I can remember all the little details from my trip - - one trick I used - everyday I mailed a postcard home with details on what we did that day. Not only do I have ready made journaling, but the postcards with their postmarks and stamps are becoming part of my scrapbook.

Thanks for stopping by today!
Friday, September 9, 2016
Nevermore - - Halloween is coming!
It's really almost here... Halloween! I am back with another mini canvas using The Robin's Nest products


To get the full "how to" head on over to The Chattering Robin's blog today!
Thursday, September 8, 2016
When Real Life and Scrapbooking collide....it isn't always sunshine and flowers!
When you are a scrapbooker, sometimes, you just have to document a not-so-pleasant life experience. I have never been one of those "Book of Me" scrapbookers, documenting every internal or personal struggle I have ever experienced.
But I truly believe major life events should be documented and I felt compelled to tell this story through scrapbooking...

But I truly believe major life events should be documented and I felt compelled to tell this story through scrapbooking...

I think my short, succinct journaling really tells the story.
And I am so very thankful for a sister that understands the importance of photos to document ALL life events, the importance of photos that are as flattering as possible and a sister that will ask your surgeon to take a photo of the tumor he is about to remove (should be noted, surgeon DID take photo, and that photo is included on the flap above the hidden journaling!)
We should all, always remember, ART HEALS.
Thanks for stopping by today!
XOXO
Friday, July 22, 2016
Feeling Nautical...
I love Nautical motifs all the time, but in summer, I am in SUPER nautical overdrive!

I have created a mini ( 8 X 8 ) mixed media canvas for The Robin's Nest this month....
Check out their blog for the complete "How To"
http://chatteringrobins.blogspot.com/2016/07/a-whale-of-canvas.html

Monday, May 16, 2016
The Robin's Nest
I can't believe my term with The Robin's Nest is already coming to an end! I have enjoyed creating with their products and inspiring you!
I have thrown my hat into the ring to be part of this team again - fingers crossed!

Here is a slide show with a re-cap of what I have created over the last couple of months using products from The Robin's Nest
And here is a little project showing the versatility of the Dew Drops:

After painting my tiny pallet with chalkboard paint and stamping the words "Merry and Bright" with Deco Art Chalky Finish paint, I then created little Christmas lights with bakers twine and white Tear Drops
Have crafty week !

I have thrown my hat into the ring to be part of this team again - fingers crossed!

Here is a slide show with a re-cap of what I have created over the last couple of months using products from The Robin's Nest
And here is a little project showing the versatility of the Dew Drops:

Have crafty week !

Subscribe to:
Posts (Atom)